

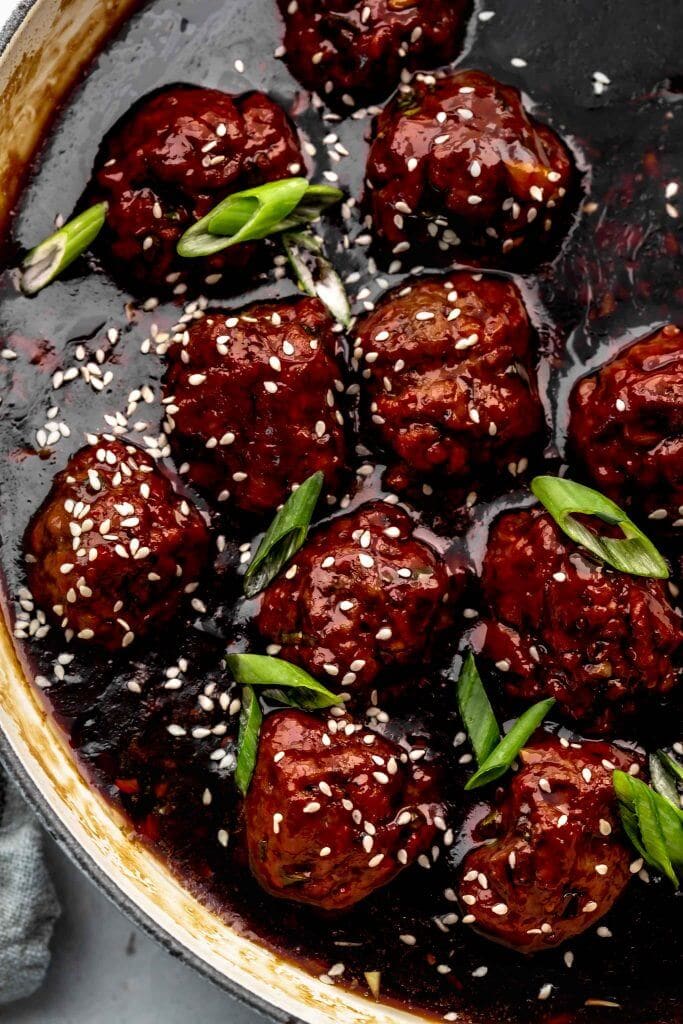
Sticky Mongolian Meatballs made in under 30-minutes! The meatballs and broccoli bake together on one baking sheet for extra easy cleanup. Tossed with a delicious, thick, sweet sauce and served over rice or noodles.

Table of Contents
My recipe for Mongolian Beef has always been a hit on the blog. Especially on Instagram. Every time that photo with the glossy sauce hits my feed, the love pours in. And since I aim to impress, I thought I’d do a fun twist on that swoon-worthy recipe, with these Mongolian Beef Meatballs.
My original recipe calls for frying up strips of beef that are coated in cornstarch to make them extra crispy. They truly are delicious! But honestly, I’m not a huge fan of frying. It freaks me out a bit to have a pan of hot oil on the stove and it makes such a mess! This recipe swaps in meatballs. They bake in the oven, right alongside some broccoli (read: easy cleanup).
For the meat, I used ground beef. But ground turkey, chicken or pork would all work! I seasoned the meatballs with spices that are echoed in the sauce – ginger, garlic and green onions.
I like to bake them on a baking sheet that’s been lined with parchment paper or foil for extra easy cleanup. Just arrange the meatballs on half of the baking sheet, and scatter some broccoli florets on the other half. Bake for about 15 minutes until the meatballs are deliciously crispy and the broccoli is tender.

Meanwhile, it’s the perfect time to whip up the sauce. The sauce is exactly the same as I used in my original Mongolian Beef recipe. It cooks up so deliciously sweet, tangy and spicy. And could I just say that I wish my hair were as glossy as this sauce. Definitely swoon-worthy.
Just bring the sauce to a boil and let it thicken for about 15-20 minutes. It should be done about the same time that the meatballs are ready. Then, toss the meatballs with the sauce, until they’re perfectly coated.
Serve it all up over a bed of instant pot rice and garnish with green onions and sesame seeds. These Mongolian Beef Meatballs are also delicious served over noodles, instant pot quinoa, or even cauliflower fried rice for a low carb option.
Or, just make the meatballs (skip the broccoli) and serve them as an appetizer either with toothpicks or on mini skewers. So much fun!
What’s in Mongolian meatballs sauce?
- Soy Sauce (Be sure to use low-sodium or the sauce will be too salty)
- Brown Sugar
- Vegetable Oil
- Garlic
- Ginger
- Rice Wine Vinegar
- Red Pepper Flakes
- Cornstarch
How to make them
- Add the ground beef, green onions, ginger, and garlic to a large bowl. Season with salt and pepper. Mix until just combined.
- Form the meat mixture into balls with your hands (or use a cookie scoop) and place on one side of a baking sheet. Add the broccoli to the other side of the baking sheet and toss with oil, salt, and pepper.
- Bake at 450-degrees for 15 minutes or until the meatballs are cooked through.
- Meanwhile, in a large skillet add the oil, soy sauce, brown sugar, garlic, ginger, water, rice wine vinegar and red pepper flakes. Simmer for about 10 minutes. Whisk together cornstarch with 1/2 cup water and add to your sauce. Continue to cook until the sauce thickens.
- Add the cooked meatballs to the sauce and toss, until the sauce coats the meatballs.
- Serve the meatballs and remaining sauce over bowls of rice (or cauliflower rice) topped with additional green onions and sesame seeds. Serve the broccoli on the side.

What to serve with Mongolian meatballs
- More → 25+ sides for meatballs.
Wine pairings
- A nice, fruity red wine such as a Zinfandel or Grenache will pair nicely with the flavors in this beef dish.
- If you’re looking for a white option, Riesling is always a great match for bold, somewhat spicy dishes.

More take out recipes
More meatball recipes
More easy dinner recipes
Did you try this Mongolian meatball recipe?
If you loved these Mongolian beef meatballs I would appreciate it so much if you would give this recipe a star review! Also, be sure to snap a picture of your finished dish and share it with me on Instagram using the hashtag #platingsandpairings and tagging me @platingsandpairings.
For more great Platings and Pairings recipes, be sure to follow me on Instagram, TikTok, Pinterest and Facebook.

Full Recipe
Mongolian Meatballs
Equipment
Ingredients
- 2 pounds ground beef
- 4 green onions (finely chopped, plus more for serving)
- 2 inch fresh ginger (grated (or 2 Tbsp. ginger paste))
- 6 cloves garlic (minced or grated)
- 1 head broccoli (cut into florets)
- 1 Tablespoon olive oil
Sauce
- 1 Tablespoon vegetable oil
- 1 cup low-sodium soy sauce
- 1 cup brown sugar
- 4 cloves garlic (minced)
- 2 Tablespoons ginger (minced)
- ⅔ cup water
- 1 Tablespoon rice wine vinegar
- 1/2 teaspoon red pepper flakes
- 2 Tablespoons cornstarch (whisked with 1/2 cup water)
- Kosher salt and pepper (to taste)
To Garnish
- 3 green onions (thinly sliced)
- Sesame seeds
Instructions
- Preheat the oven to 450 degrees F. Line a baking sheet with foil or parchment paper.
- Add the ground beef, green onions, ginger, and garlic to a bowl. Season with salt and pepper. Mix until just combined. Roll into tablespoon-size balls, placing them on one side of the prepared baking sheet. Add the broccoli to the other side of the baking sheet and toss with 1 tablespoon oil, salt, and pepper. Transfer to the oven and bake for 15 minutes or until the meatballs are cooked through.
- Meanwhile, in a large skillet add the oil, soy sauce, brown sugar, garlic, ginger, water, rice wine vinegar and red pepper flakes. Stir and cook over medium-high heat, for about 10 minutes. Whisk together cornstarch with 1/2 cup water and add to your sauce. Continue to cook until the sauce thickens. Remove from the heat.
- Add the cooked meatballs to the skillet of sauce and toss, until the sauce coats the meatballs.
- Serve the meatballs and remaining sauce over bowls of rice topped with additional green onions and sesame seeds. Serve the broccoli on the side.
Nutrition
This post was originally published in 2021. It was updated in 2023 to add new content. The Mongolian meatball recipe remains the same. Enjoy!


Leave a Reply